
How To Scan Documents With your iPhone or iPad

After using my iPhone for several years now, I’ve downloaded many document scanner apps. From time to time, I find some of them buried in my library, and the only thing they do is take up some of my precious storage I could use for something else. But how to scan documents with your iPhone (or iPad) if you get rid of these Apps?
If you’re, just like me, tired of storing these useless scanner apps just to never use them again, then this one single App is just for you.
Good To Know
To scan any physical document with your Apple Notes App, you should:
- Go to the Notes app and choose a note or create a new one.
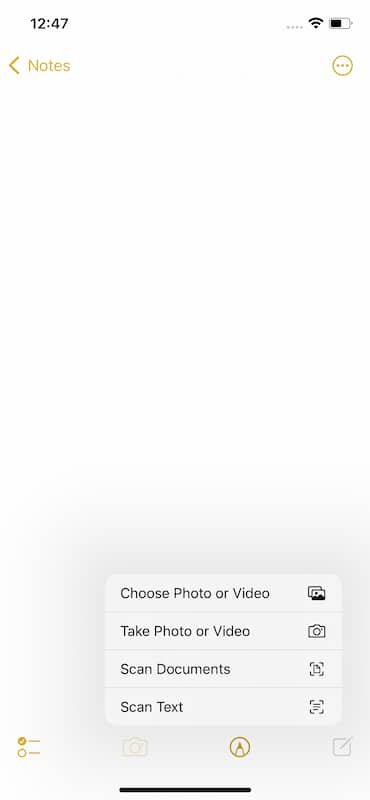
- To access the camera feature, tap on the Camera button. From there, select Scan Documents.
- Make sure your document is in the lens of the camera.
- If your device is in Auto mode, your document will be scanned automatically.
- To save the document, tap on Save or add more scans to the document.
Here are the steps to scan a document on your iPhone or iPad
Be aware that the document scanner option is located in the Notes app of your iPhone or iPad. But don’t worry because the steps to have a high-quality scanned document that is ready to be converted to PDF, and stored in your Files App are pretty straightforward.
- First, go to your Notes app and choose a note or create a new one.
- To access the camera feature, tap on the Camera button. From there, select Scan Documents.
- Make sure your document is in the lens of the camera.
- If your device is in Auto mode, your document will be scanned automatically.
- To save the document, tap on Save or add more scans to the document.
The Steps to Save These Scanned Documents as a PDF File
Back in the day, you would have to convert your scanned documents into PDFs manually. But with the introduction of iOS 15, your Notes app will do it for you automatically.
However, since you can’t store these documents in your Photo app, you’ll need to save your document in a document-sorting app like the Files app. This is how to do that.
- Simply tap your scanned document.
- Then tap the share button in the upper-right corner of your screen.
- And finally, select the app that you want to save your PDF to and follow the process for saving a file in that app.
How to edit your scanned documents right in your iPhone or iPad
Scanning and converting documents to PDFs is cool and all, but it gets more exciting when you can edit these scanned documents with the built-in markup tool in your Notes App. Meaning that you can add notes, highlights, and even signatures on top of a scanned document, and share it with a colleague or friend.
- To do this, stay on your scanned document in your Note App.
- Then, go to the share button in the upper-right corner of your screen.
- From the options you get, Tap on Markup. You need to scroll down to see this option.
- Now you should get a couple of tools you can choose from. Tap on the tool you’d like to use.
- If you want to add text, a color, a signature, a magnifier, or shapes to your document, then simply tap the + icon.
And those were the steps to scan a document, convert it to PDF, and edit it to add more notes and test on it.
Read Next
- Unboxing Gold iPhone 13 Pro Max in 2022
- Apple Shows The Cinematic Powers Of The iPhone 13 Pro
- Trying to earn money from iOS App Development? You better be a good one
- Using Jarvis To Write a Blog Post? It will do more harm, than good
- Review of The Samsung Galaxy Z Flip 3. A Foldable Phone That’s durable


3 Comments