
12 Steps To Clean Your Mac And Make it Run Faster

Do you really need to know 12 steps to clean your Mac to make it run faster? The answer is Yes. Every bit of information you learn about cleaning your Mac will arm you against a slow-running machine. The good news is that I’ve made a list that you can scan and benefit from. So, yes, you need to know them all, but you don’t need to read every single word in this article.
The 12 steps to clean your mac and Make it Run Faster in a Nutshell
There are a couple of things you can do to make your Mac run faster:
- Use the built-in First Aid Option.
- Find the files that you don’t use and delete them
- Clean your mail
- Look for the apps that require a lot of storage.
- Clean out browser extensions you don’t need.
- Empty the caches of your Mac.
- Disable sync between Mac and iCloud.
- Clean up your download folder.
- Remove those huge backups of your iPhone/iPad.
- Upgrade your Mac with more RAM
- Deactivate the Apps that launch when your Mac startsup
- Shut Down your iMac more regularly.
All these options are explained in detail in this article.
Use The First Aid Option
When thinking about First Aid, you may be thinking about some emergency or immediate care you need to provide to a person. First Aid here is built-in software that lets you find and repair errors on your hard disk.
To be more specific, it lets you find and repair errors related to the formatting and directory of your Mac Disk. It cleans up all the applications you’ve downloaded in the past. And with clean-up, I don’t mean deleting these applications. I rather mean repairing the so-called “disk permissions” that come with the apps you’re regularly using. In general, these disk permissions tell your Mac to what extent you’re allowed to use which part of the app.
Luckily, you don’t have to download any third-party app to perform First Aid on your Mac. It’s a tool that communicates with your Mac’s disk. To run First Aid on your Mac, you need to:
- Open Spotlight by clicking on command ⌘ + space bar simultaneously.
- Type in Disk Utility.
- Click on the internal disk that says Macintosh HD.
- Click then on the First Aid button, which is displayed right above the Macintosh HD disk.
- Now you should get a pop-up with the question if you would like to run First Aid on “Macintosh HD.” Click Run.

Find the large files that you don’t need and delete them
It’s advantageous to know what files take the most space on your hard disk. However, if you aren’t tech-savvy, finding all these big files might be challenging. Luckily, there is software that you can download for free that will help you find these large files.
Disk Inventory X, for example, is a software that scans your Mac’s hard disk and displays all the folders and files stored in your machine. As a result, you get a picture resembling a map with all the files using most space.
Be careful, though, with deleting files in this stage. Don’t go crazy and delete the files that might be crucial for running macOS. Also, be careful with deleting all files at once. You then might be deleting photos or videos that you attach a lot of value to.
A tip I can give you is to store important files on an external hard drive. Therefore, I recommend buying external SSD hard drives.

Warning
Be careful with blindly deleting files in your storage, as macOS Software might need some of these files to work well.
Clean Up Your Mail
Many people might overlook this, but cleaning up your Mail can release your laptop from a lot of junk. Think, for example, of those emails that contain large attachments. Over time, all these emails combined can take up more than 10 gigabytes of storage!
And sure, some people may have set their settings so that the mailbox is cleared automatically. But the majority of people don’t have this setting turned on. So if you use Apple mail for a long time now, there is a good chance many email attachments are accumulated.
The first thing you need to do is clean your Mail from all the emails that contain such large attachments. This might be a daunting process, so call the help of software. My favorite one is CleanMyMac (no affiliation). This software will clean your email and all other junk that has been gathered over the years. You can use it for free and decide for yourself if you want to upgrade to the paid version.
After this step, go ahead and change the Apple mail set not to download attachments automatically. This is a set and forgets option that will save tons of space in the future. To change this setting, you need to:
- Open your Apple Mail App.
- Go to Mail > Preference or just press ⌘ + comma simultaneously.
- Select your mainly used account.
- On the right side, you will find the Download Attachments option with multiple options. Select None.
Your Mail app will not download any attachments automatically unless you click on download. This way, your Mac’s storage will not get overload with tons of data that it isn’t using.
Read also:
How To Set Up a Passcode For Your iPhone, iPad, and iPod Touch.
How To Unlock iPhone While Wearing a Face Mask
Look For The Apps That Require a Lot of storage.
We all have those apps that we never use but take up a huge chunk of our storage. So why not just remove them? Take, for example, the App GarageBand.
If you’re a musician, then this application is excellent for you. It’s free for Mac users and very powerful. But if I take myself as an example, I’ve never opened this app in my life. And when I went to check out how much space it takes, I discovered that this app alone takes a whopping 1.7 GB of storage. Add more of these apps, and you end up with 10 -20 GB of unneeded files.
The best part is that if you find out that you may need them in the future, you can easily open the App store and bring them back with a one-button click.
Clean Out Browser Extensions You Don’t Need
Chrome and Safari can be extra powerful with additional extensions. But many of these extensions can end up overloading your web browser, thus taking more space on your hard drive. For sure, some extensions are essential for your day-to-day work, but most of them are just sitting there.
Be critical about the extensions you use and the ones you don’t use. You’ll be surprised to find out how many web extensions are just sitting there doing nothing. Don’t know how to remove web extensions? Check out this article!
Disable Sync Between your Mac and iCloud
If you disable this feature, your files will stop showing up on a secondary Mac (your MacBook, for example). It basically means that you will not be able to open a document on, let’s say, your iMac and continue working on it on your MacBook. But having this option turned off will help you save up storage on one of your computers.
Check out this article to learn more about how to disable sync between your Mac and iCloud.
Clean Up Your Download Folder
You might be surprised how many documents are stored in your Download folder without realizing it. Think of the extra files that you get along with applications that you’ve downloaded from the web. No looking at your Download folder regularly, and you will end up with a few Gigabytes of data that you don’t use anyway.
An advice I can give you is to make your download folder visible in your dock. This way, you will always be aware of the current state of this folder: is it already time to clean it up or not.
Remove old iPhone/iPad Backups to free up storage on your Mac
It’s just unbelievable how much storage iOS files can take up. And the best part, most people don’t even know that they have iPhone and iPad backups stored on their Macs. And that’s understandable because we actually don’t see these files until we dig more into the memory of our Macs.
The easiest way to know whether you have iOS files saved up in your Mac is by clicking on the Apple logo at the upper left of your screen. Then, click About This Mac and then click on the Storage tab.

Now you should see a bar with colored sections. Each section resembles a category of the files and data stored on your Mac. So, for example, if you see a section with the name iOS Files, you know how much storage those iOS files are taking up.
If you’re sure about deleting these files, just click on the Manage button > click then on iOS Files in the left panel. Now you get more information about these files, such as the date accessed, the size, and which iPhone/iPad they belong to. These pieces of information will make it easier for you to decide whether to keep them or get rid of them.
Empty the caches of your Mac
Just like how our bodies store unnecessary fats, our computers stores unnecessary junk. Also known as caches. You can quickly delete these caches so let me show you how.
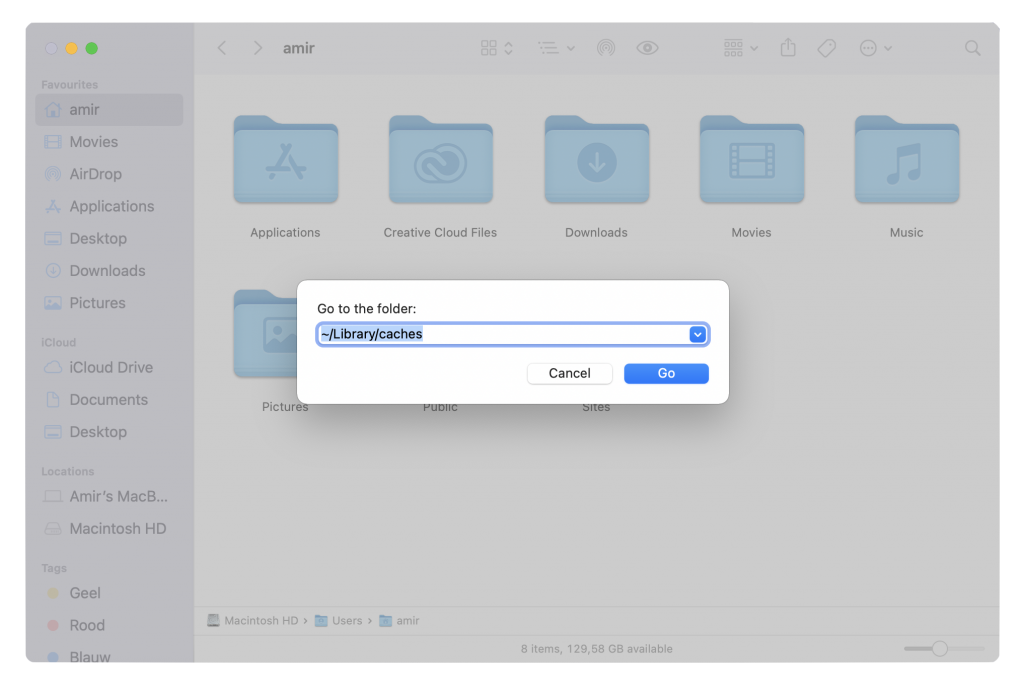
- The very first thing you need to do is open Finder.
- Then you need to press command⌘, shift⇧, and the letter G simultaneously.
- In the search bar, type
~/Library/Cachesand click on Go. - Select all the files that you find in this path by pressing on command⌘ + A.
- Click on command ⌘ + backspace ⌫ to delete all these files.
Upgrade Your Mac With More RAM
Memory RAM is the short-term memory of a computer. Your Mac uses this memory to store the currently running tasks to run them much faster. The difference between this data and the long-term data that’s stored on your hard drive is that your computer forgets the short-term memory data the moment you shut it off.
If you have a MacBook, then it’s very hard to upgrade your Memory RAM. But if you have an iMac (up to the iMac 2020), then you can easily upgrade your Memory RAM up to 128 GB, which is a lot.
Shut Down Your iMac More Regularly
It goes without saying that shutting down your iMac more frequently is overall good for the longevity of your machine. It also helps in its performance. Your Mac will run much faster just by turning it down every now and then.


5 Comments